
Desktop content graph part 3. Building the initial application
The first three parts in this series dealt with issues of information design; the overall ideas, the model and taxonomy considerations.
- Part 0 Setting the scene
- Part 1 The model for the Desktop content graph
- Part 2 Tags and taxonomies
- Part 3 Building the initial Desktop content graph system (this article)
This article is about how I began to build the Desktop content graph application. The conceptual design for a new application is in place. I’ve also developed the content model to a usable state, and introduced a taxonomy. Now it’s time to start trying out a few ideas in code.
My starting point was to think about how I wanted the user to interact with the system. I’m a big fan of user-centred and visually-driven software and also drag-and-drop interfaces, so this was the starting point. Some of the requirements appeared quickly.
- The application needs to be independent of the operating system, so it needs to include a workspace where the user can place file objects and link them together.
- The user needs to be able to drag any file (or folder) in from the file system (the Finder, in the case of MacOS), drop it into the workspace and move it around as required. That is, the visual design should allow for drop, display and move of graphical objects.
- When a file is dropped into the workspace, the properties needed in the information model should be captured from the file and stored as object or data properties in the graph.
- There should be a clear and simple mechanism to link files together. When linking files the link type (or predicate) will be captured into the graph.
- There should be a facility to collect tag links. If a file dropped in the workspace has Finder tags then the application should create inverse isClassifiedWith and classifies triples. This will be linked to SKOS Concepts derived from the tag string, with classification metadata using the information model. I would like to give the user the option to add further tags as SKOS Concepts.
- The workspace should show linked files. It could also display classification metadata (perhaps with a display toggle).
- The content graph will need to be saved out of the application. If the user has access to a graph database such as GraphDB, then there will be an export mechanism using the GraphDB API to send the collected triples to the repository. If the user cannot, (or chooses not to), use a graph database then the system can serialise the graph data out in JSON format. The mechanism that I’ve used here allows for de-serialising (round-tripping) the graph data when the program runs in future.
Some of these requirements were fairly straightforward to put into code. The major technical issue that I found was implementing drag and drop smoothly. This was not so much because it is inherently difficult, but more because the concept behind graphics programming were quite new to me. Coding a visual workspace requires working out how to draw objects, place them in a 2-D space, move them around, draw lines between them and so on. I had to dredge up some school-era trigonometry (remember sines and cosines?) in order to understand things. Just to give you an idea, here is a sample, that draws the barbs of an arrow on a line linking two files. I'm taking no credit for this, by the way, I built on a great piece of example code, one of the benefits of the strong Xojo user community.
// First barb point
ax1 = x3 + s * Cos(a + angle) * arrow
ay1 = y3 + s * Sin(a + angle) * arrow
// Second barb point
ax2 = x3 + s * Cos(a - angle) * arrow
ay2 = y3 + s * Sin(a - angle) * arrow

// Arrow point is at the end point of the link (x2, y2)
// ax1, ay1 is the first barb point of the arrow
off.Graphics.DrawLine(x3, y3, ax1, ay1)
Development environment
For the application design and build itself, I used a cross-platform development tool called Xojo. This is cross-platform both in the sense of the development environment being available in MacOS, Windows and Linux versions, and in the sense of creating native compiled applications for MacOS, Windows, IOS and Linux. As I am not a development professional this flexibility is very appealing to me; the easier it is to get things done, the better. Xojo scores highly here; it has a clear user interface and a good code editor, and uses object orientation and event-driven mechanisms widely. Of course, that would be of little use if I couldn't use it to do what I wanted to do. In fact I haven’t yet found any application area that I can’t work on with Xojo. Xojo comes with a good range of built-in controls and classes, but there is also a very well-established eco-system of plug-in controls, classes and modules that enhance the capabilities of the product. All in all, Xojo is a fully-featured professional object oriented development tool. As someone who has written a book on MacOS development with Xcode (an earlier iteration of Apple's Swift development tool) I can say confidently that Xojo is a far more attractive design and build environment for applications.
My approach to the program began with exploring how to manage graphical objects within the user interface. Xojo provides a built-in control (actually it's a class) called Canvas for this purpose; basically a 2-D workspace in which object images can be drawn, moved and resized.
I should say that I am not going to describe each stage of the development in tedious detail. Few readers would be that interested in that, particularly as my development skills would best be described as disorganised. Instead, I will talk about the strategic approach, and show how the application works at particular stages. I will also include all of the code as a github repository. Xojo code is pretty readable; it has its roots in the beginner’s language BASIC, and in fact an earlier iteration of Xojo was called REALBasic (it has come a very long way since then, so any developer sniffiness about BASIC is quite misplaced).
Object design
In terms of object design, the program is framed around classes called Node, Concept, Link, Triple and TripleStore.
- A Node is an object that has been added to the workspace. It represents a file in the file system.
- A Concept is an object that represents a taxonomy concept. It is an elaboration of a Finder tag in this model.
- A Link is the link between two Nodes, or between a Node and a Concept. It will develop into an RDF predicate in due course.
- A Triple is the collection of three things (two Nodes and a Link, or a Node, a Concept and a Link)
- A TripleStore is a collection of Triples
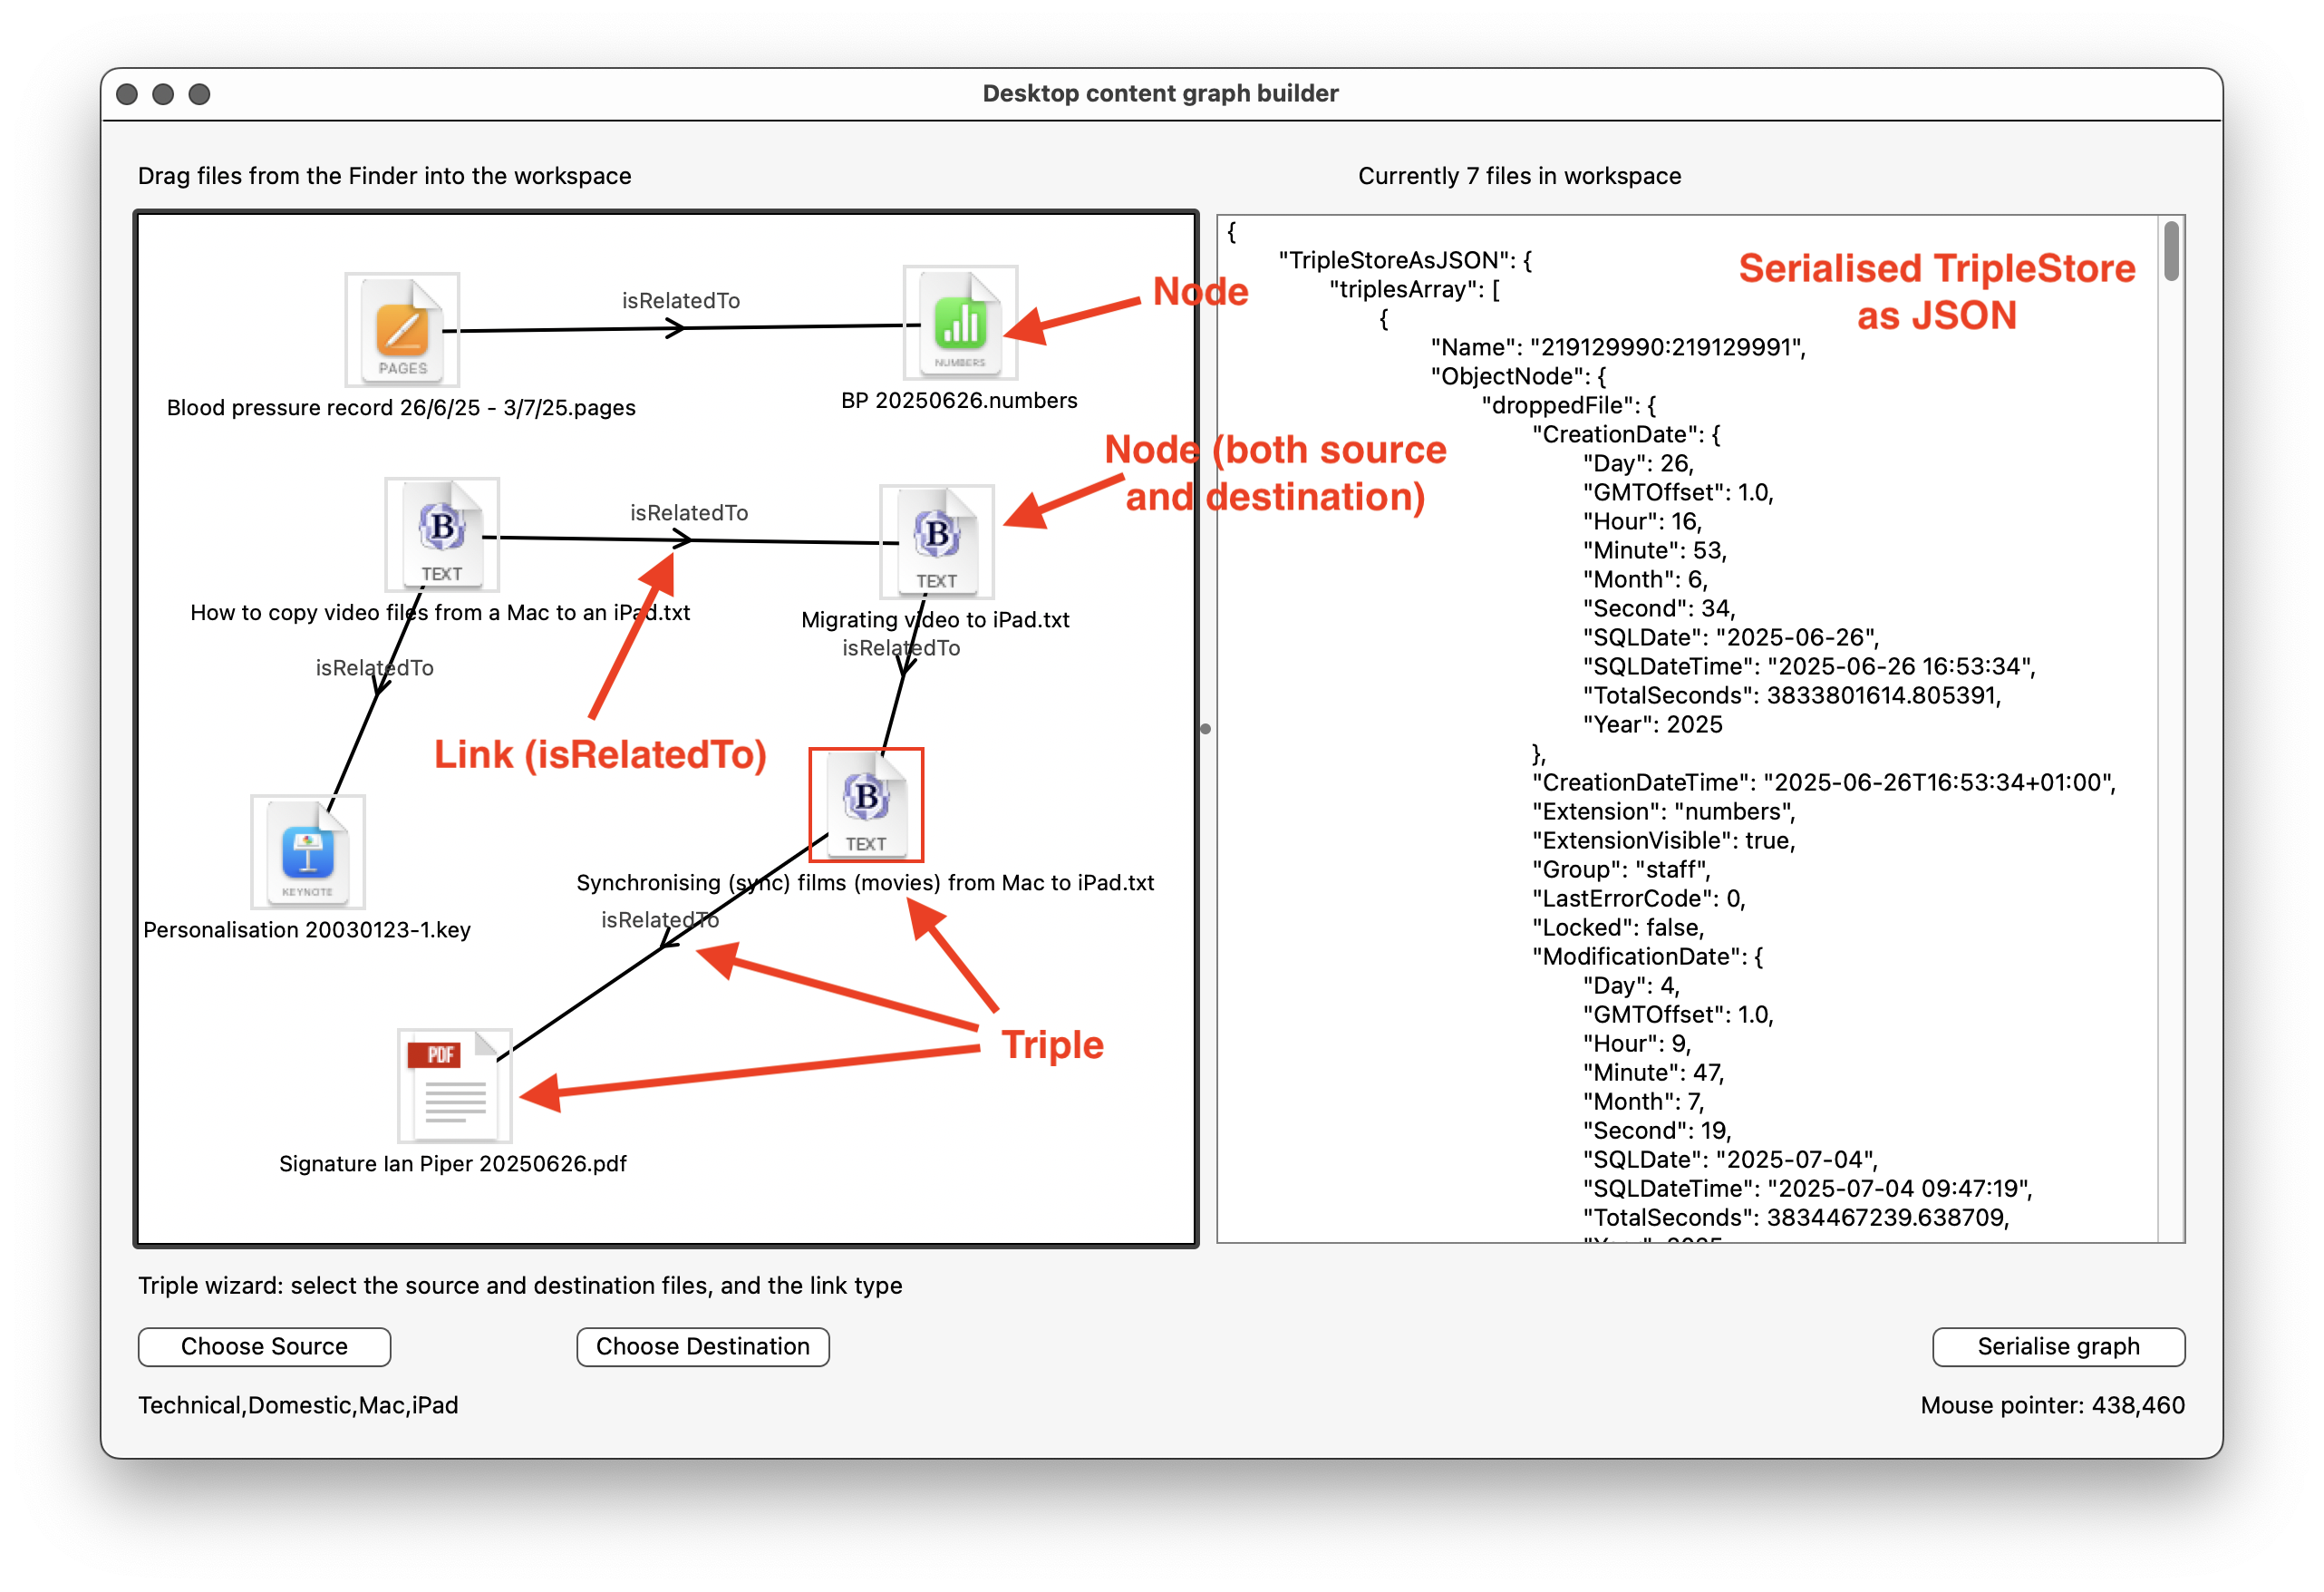
The image below shows the UI at an early stage of development. It shows a number of file objects that have been dragged into the workspace to make Nodes, and a set of links (as Link objects) between these objects. There are a number of Triples, where two Nodes are connected by a Link. The panel to the right shows a serialised form of the final TripleStore, which is a collection of triples. In the JSON document the root is called TripleStoreAsJSON, with a child of triplesArray, and a child from that of ObjectNode, which in turn has a range of metadata. Through this serialisation the same set of Nodes, Links and Triples can be restored later.
Some code talk
In this section I’m just going to introduce the Xojo approach to coding, with a couple of examples to exemplify it.
First, what happens in the code when I drag a file from the Finder and drop it onto the workspace?
Xojo is an event-driven tool, which means that controls are able to respond to an event. I’m not going into Xojo Events in massive detail, by the way, out of consideration for the reader. But a Xojo Event is triggered when something happens to a control (like dropping a file from outside the program onto it) and the Event handler deals with the result.
Xojo is also highly visual, allowing the developer to draw the user interface and to place controls within it. In the user interface shown above I have built a Window object, and within that there is a Canvas. In the image above the Window takes up the main part of the image, and the Canvas is the area to the left with a heavy border. To the right of that is a TextArea, which holds multi-line blocks of text (that's just there for debugging purposes during the early stages of development by the way; you'll see below that I changed this later on to a DesktopListbox to hold Finder tags). These are all classes within the Xojo application class hierarchy, but really they're not too different from classes that I have created within my application.
Over the course of the program I will be creating objects belonging to the Node, Link, Concept, Triple and TripleStore classes. Xojo is a fully object-oriented development system, allowing you design classes with their own sub-classes, events, methods and properties.
As the names suggest, a Node is the thing that I place on the workspace by dropping a file from the Finder. It has properties such as x and y positions, object dimensions, FolderItem details, a URI, and other metadata.
Let’s look at Node in more detail.
This class exists to manage objects dropped on the workspace, so needs to have the appropriate methods, properties (and where appropriate, events). Here is how it looks in the Xojo application UI:
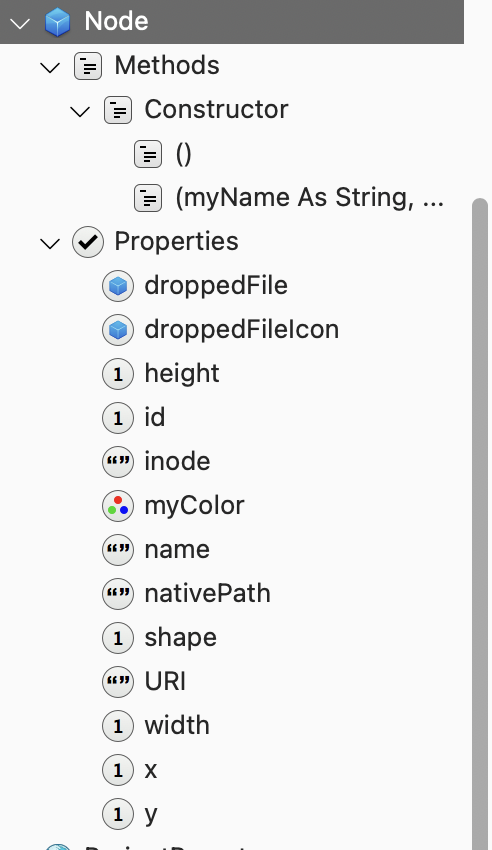
The Node class has a special method called a Constructor, a method that is run when an object is created (or instantiated). This is a way to create a new object complete with its properties. Actually, you can have more than one Constructor, with different sets of parameters (this use of multiple versions of a method with different sets of parameters is called overloading, and it is widely used in Xojo), and in this case there is an empty Constructor. Without going into details, the reason for this is that I am using a plugin that will later on be used to serialise all of the necessary classes, and that plugin requires that each class has an empty Constructor. I have no idea why this is required, but it doesn’t cause me any problems to include it, so here it is (this lack of curiosity on my part, by the way, may give you an insight into the level of my programming skill).
The properties manage all of the necessary metadata for the Node, and should pretty self-explanatory. Suffice to say that once created, these properties enable the application to keep track of where it is, how big it is, what kind of thing it is, what colour is used for its border when it’s selected, and what file properties it has.
When a user clicks on a file in a Finder window, then drags it over and drops it on the Canvas within the application UI, it triggers events such as MouseDown, MouseDrag and DropObject event on the Canvas. Each event can have code attached that runs when the event triggers. The DropObject event is where I put code to create a new Node. Here’s how the code for DropObject looks. I’ve left out some of the details, but the entire code listing will be available in GitHub in due course.
file = obj.FolderItem
dim fileURI As String
[...]
fileURI = winMain.generateURI(file.nativePath +  file.MacNodeIDMBS.ToString)
[...]
Me.Nodes.Add(New Node(file.DisplayName, obj.DropLeft, obj.DropTop, obj.DropWidth,obj.DropHeight,2,Color.RGB(255,255,255), file, file.MacNodeIDMBS.ToString, file.NativePath, fileURI))

// Get the array of Finder tags from the file object
dim names() as string = file.TagNamesMBS
// Unpack the array and display the tags in the status bar
winMain.lblStatus.text = String.FromArray(names,",")

// Show how many nodes there are in the workspace
winMain.lblNodesInformation.text = "Currently " + me.nodes.LastIndex.toString + " files in workspace"

// Redraw the UI
Refresh(True)
First, the dropped object is picked up as a FolderItem (in Xojo, the FolderItem class handles files and folders) and assigned to the file property of the Canvas. From this point I can manage it as an object through its descriptor, file. In the first line, I’m creating a URI (fileURI) for the new dropped file. I’m concatenating the native path of the file with the file inode, then running it through a custom method called generateURI.
Next, I’m creating a new Node object and adding it to an array called Nodes() (the parentheses confirm that it is an array of objects).
Next, I capture the list of Finder tags belonging to the dropped file, and put it in the Window status bar.
The final step is to redraw the UI using the Refresh command. The True parameter forces an immediate redraw (otherwise it will only happen when the user moves the mouse over the canvas).
By the way, a keen observer will see that the code that builds the new Node seems excessively duplicative; I’m passing in the file display name, the file native path, the file inode and the file URI, as well as the file object itself. Strictly speaking I could have just passed in the file object, and extracted the other properties from the resulting Node as needed, but the extra data makes it convenient from a data management point of view.
This is just a snapshot of the code in the application; I’m painfully aware that a professional developer will probably look at my code with disdain, or worse. Never mind; it does what I need it to do, which is enough for now.
What’s missing?
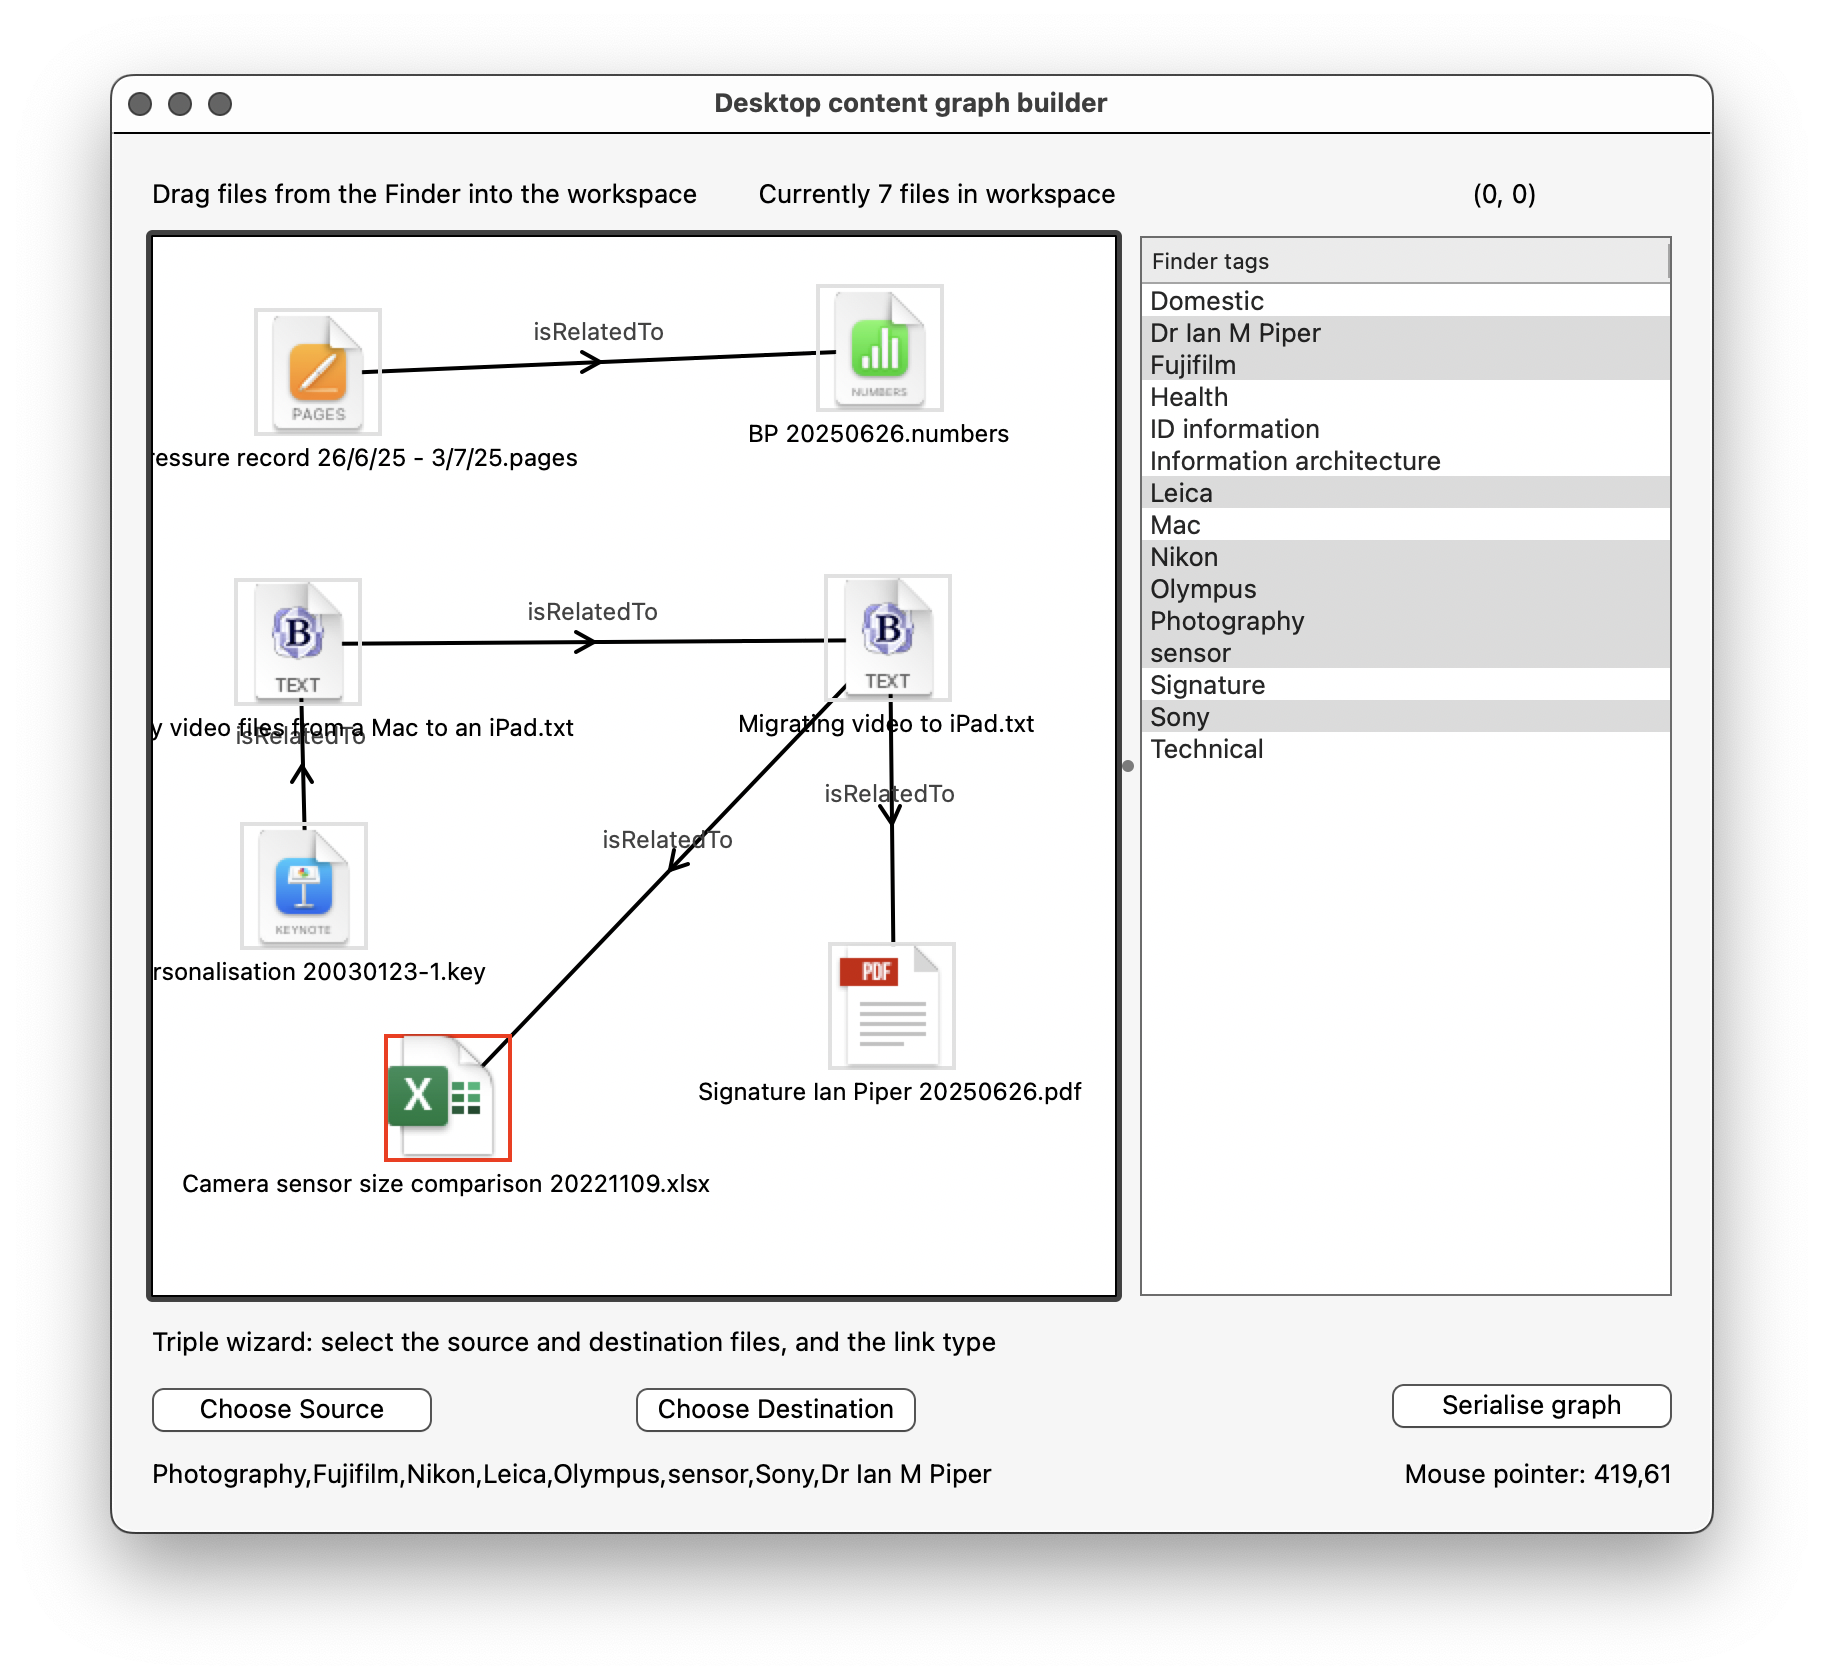
In my Desktop content graph, I can create semantically linked file objects, and I can save the linked data out as a graph. But I don’t yet have the tags for files captured in any meaningful way. It’s not that I don’t have them at all; if you look at the screenshot above you can see that the currently selected Node (red border) has, displayed in the bottom left of the window, Finder tags called Technical, Domestic, Mac and iPad. I captured these along with the file. The screenshot below shows the UI at a slightly later stage of development. Here the right hand panel shows a collection of the Finder tags for all of the files that I have dropped on the workspace. The list items that reflect the Finder tags are highlighted for the currently selected item in the workspace. Later on I will use this as a stepping stone to the construction of Concepts from Finder tags and ultimately to the incorporation of the new Triples into the graph.
However, these are just keywords; strings of text. In order to use them in the content graph I need to convert these Finder tags into Concept objects with URIs and any other necessary metadata. That will be in the next article.
I haven’t yet put in place the tools to write the graph out to a GraphDB repository. I don’t anticipate any major issues with doing this, having done it many times before. In a similar way I need to create the code to write out the graph to a file (in case the user doesn’t have access to a graph database) and to round-trip the data back in. I'll cover this in the next article too.
At the moment, the user adds files to the workspace by drag and drop, and the process for linking them is manual (and, frankly, a little clunky). I’m thinking about a more elegant way of doing both. The process of building taxonomy-centred Links is also at a very early stage.
In summary, this has been a promising start, and enough for an initial article, but there is a long way to go. Should be fun.